
3. Tarhu Cone Design 1995 > 2019
Peter Biffin August 2019
Tarhu cone design has gone through several different phases. From 1995 until 2004 all forms of tarhu shared the one design concept: a floating bridge in contact with the cone via a single “foot”; an aspect ratio (height to width) of around 1:4; the cone made out of radial strips of very thin Western Red Cedar; the design divided into a compliant flat edge glued to a more rigid cone-shaped centre section.
From 2004 until 2016 large and small tarhus diverged, with two different designs being employed. Large tarhus retained the design described above (now called type 1) and small tarhus used a new design (now called type 2), which had: a fixed bridge permanently glued on top of the cone; an aspect ratio around 1:3; an extremely compliant moulded edge. Throughout this period longneck tarhu always used type 1, kamancheh tarhu and shah kaman always used type 2, but nak tarhu and tarhui sat ambiguously in the middle.
In 2016, type 3 developed. It used; floating bridge connected by a single foot; an aspect ratio of around 1:6; edge and middle fully integrated in a curved shape. The intention was that this new design would be used in tarhus of all sizes. However as experimental work continued, it became evident that each form of tarhu has quite particular needs in terms of cone design, and it was a waste of time trying to work out a one-design-fits-all concept. Three cone types are now in use and each will be described in detail.
Type 1 – floating bridge

Bridge: floating bridge in contact with the cone via a single “foot”
Edge: flat edge of radial grain timber glued to a more rigid cone-shaped centre section
Aspect ratio: around 1:4
This design has been a feature of longneck tarhu from the first tarhu to the present. The experimentation has largely revolved around fine-tuning the ideal size of the cone, along with small adjustments to the aspect ratio. In the middle years some comparatively large cones were made, with correspondingly larger bodies. Larger cones suited the bowed function better, but as both plucking and bowing were required, the cone dimensions, cone materials, construction methods and aspect ratio used in 1998 remain almost identical to those used in 2019, even though by 2019 a new body was in use that was a little larger.
One development that became possible by using a standard size cone in a slightly bigger body is that the cone could be positioned off-centre. In a longneck tarhu, the bridge stick is about 15mm off centre on the bass side. If the cone is positioned centrally in relation to the body, the bridge-stick consequently drives the cone 15mm towards the bass side of the cone’s apex. By moving the cone 15mm towards the bass side, the bridge stick is then centred on the middle of the cone.

Cone offset - shown here on a shah kaman.
A new flat edge design was developed around 2010 using radially oriented strips of carbon fibre, the edge being roughly the same width as the initial flat wooden edge (20mm). This was extremely good in every respect except that it was very labour intensive to make. NB this was not a woven carbon fibre cloth – it was considered very important that no redundant weight be introduced and so fibres were only used in the orientation they were needed – radially).

Uni-directional carbon impregnated with epoxy resin and laid on very fine cloth (as a carrier). All but the inner few cross-linking fibreglass threads were cut so that the carbon could be splayed out in a fan-shape. Once configured it was covered in plastic sheet both sides and then pressed flat while curing.
This edge could be sanded to reduce stiffness in the same way as the flat wooden edge (even though it was much tougher to sand). Eventually, good as it was, the radial carbonfibre edge was replaced by the original flat wooden edge purely because of practicalities. The fragility of the wooden edge was therefore accepted as being a necessary evil in order to achieve the desired flexibility in fine-tuning the sound of an instrument.
As the size of type 1 cones is reduced, this design has a tendency towards producing wolf notes (this was one of the principal reasons for developing type 2 cones for use in small tarhus).
TYPE 1B
Bridge: floating bridge in contact with the cone via a single “foot”
Edge: moulded round edge made from polyester cloth and epoxy resin
Aspect ratio: around 1:3.5
The great majority of type 1 cones have used a flat wooden edge - however there were experiments over several years around 2005-2008 in which a moulded round edge was used in both longneck tarhu and nak tarhu. This edge design came into being as a result of fine-tuning the desired resonant frequencies of the cone. The flat edge was made from western red cedar 20 mm wide and began at 0.6 mm thick. As the edge was sanded thinner in order to lower the resonant frequency, it would often end up as thin as 0.3 or 0.4 mm. In western red cedar that thickness is quite fragile. The two options were to increase the width of the edge or else change the material it was made from. A moulded edge was already in use in type 2 cones by this stage, so the moulded edge design was adopted as the starting point.
Early on in tarhu development, one goal was always to make the cone as big a possible (within the limits imposed by the particular body shape/size). The type 2 edge design was attractive in that it allowed an increase in cone width because the moulded edge was significantly narrower compared to a flat edge of the same stiffness. In type 1B cones, edge stiffness was controlled by changing the weight of the polyester cloth that was used in the composite. This imposed significant restrictions on adjusting the final resonant frequency of the cone. With a flat wooden edge, going through a process of listening to the instrument, sanding the edge, further listening, further sanding is very important in the creation of a tarhu’s sound – far more important than squeezing a few extra millimetres out of the cone width. For this reason the moulded edge was abandoned.
Type 2 – fixed bridge
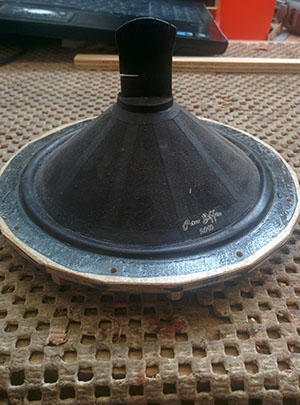
Bridge: permanently glued to the apex of the cone
Edge: moulded round edge made from polyester cloth and epoxy resin
Aspect ratio: around 1:3.5
Cones for the smaller tarhus began as scaled down versions of the longneck tarhu cones – the aspect ratio remained basically the same, with the same flat-edge concept. When really intensive work on kamancheh tarhu began in the leadup to spending time with Habil Aliyev in 2004, using the type 1 design was thrown into question. Three main problems emerged:
· the flat edge made from radially oriented cedar strips had to be significantly wider in proportion to the size of the cone itself (and had to be made dangerously thin) in order to have the cone resonant frequency in the desired range:
· with the edge designed this way the instruments lacked volume and projection once the resonant frequencies were where they needed to be;
· the assembled instruments were prone to wolf-notes. These were usually not too dominant in first position but more of a problem in higher positions. At present there is no adequate explanation for why this cone design was more susceptible to wolf notes as the size decreases but it has been tested often enough in different situations to be proven a reality.
Solving these issues required a change in concept. The main requirement was for an edge that could have a lower stiffness in a narrower width, making it possible to lower the main resonances while retaining a larger cone. A moulded edge, similar to that used in electric speaker cones was the obvious choice – however when this was made to the target stiffness, there was insufficient spring in the system to prevent the bridge stick from rattling against the top of the cone when firm bow pressure was used. The solution was to glue the bridge on to the cone.
While making the edge more flexible and gluing the bridge onto the cone may seem like small changes, they created a completely different structure to any previous work - the cone vibrated in a different way and its main resonant frequency was more than an octave lower than a type 1 cone of the same size. This new concept solved the problem of small cones being susceptible to wolf notes - type 2 cones have remained almost trouble-free in this regard. It also brought with it a far greater range in tone colour variations than a type 1 cone of the same size.
This design was the one refined in collaboration with Habil Aliyev in 2004. In essence the design remained unchanged until 2015. It had many strong points and produced some very good instruments……… but had a few issues that needed addressing:
· It was impractical to change the stiffness of the moulded edge after it was pressed – this made it much more difficult to adjust the sound of an individual instrument once it was strung up.
· The thin moulded edge was susceptible to distortion caused by unequal downward string pressure on each side of the bridge
· If the bridge received a sharp knock the glue-line holding it onto the cone could fail.
While some of these issues were relatively minor, the lack of adjustability in this system was a problem. In addition, I was interested in exploring cones with a much higher aspect ratio and that weren’t divided into cone/edge. Type 2 cones were discontinued in 2016, replaced by Type 3 in kamancheh tarhus, shahkamans and tarhuis.
Type 3 – floating bridge, curved cone

Bridge: floating bridge in contact with the cone via a single “foot”
Edge: edge and middle are completely integrated in a curved cone.
Aspect ratio: around 1:6
Solving the various issues of type 2 cones generated a new design that was closer to type 1 – floating bridge and the cone having a cedar edge. This time, however, the cone was quite a bit flatter (aspect ratio around 1:6), the cone was curved, the edge was an integral part of the cone, and the bridge was prevented from rattling against the top of the cone by a pair of tiny, very powerful magnets (one mounted in the bridge stick and one mounted in the apex of the cone). The cone was also displaced from centre so that the bridge stick connected with the cone at the cone’s geometric apex.
This design was structurally successful and produced a strong and rich sound in the desired resonant frequency range. Unfortunately it was also prone to wolf notes. The indications are that these were caused by there being lower cross-grain stiffness in a curved cone. In a straight cone, the cone is straight along the grain, but curved across the grain. This raises cross grain stiffness. In a curved cone the situation is reversed – curved along the grain, flat across the grain…..which creates lower cross grain stiffness, and (it is assumed) consequent wolf notes. If the cross grain stiffness is raised by gluing on concentric carbon fibre strips across the grain, wolf notes can be controlled.
This design has been used in one form or another in kamancheh tarhu, shah kaman and tarhui since 2016. With the addition of the concentric cross-grain stiffening, it has a lot of potential and is worthy of further attention.
Ease of adjustment
It should be plain from the descriptions above that ease of adjustment is considered to be an absolutely essential aspect of tarhu cone design. No matter how much attention is given to the thickness, density and grain-orientation of the timber used for a cone, there will inevitably be variations in weight, stiffness and resonance in cones made to exactly the same specifications. While making changes to the thickness/stiffness of the middle part of a cone is feasible, it is not practical as standard procedure. The edge is where change can most easily be affected, so it needs to be either flat, as in type 1 and type 3 or have an easily accessible adjustable component as in type 2B.
A few useful tools in making adjustments
Depending on the thickness, density and grain-orientation of the timber used for a cone, the resonant frequencies from one cone to the next can vary over a considerable range, with commensurate variations in sound quality. Keeping track of these resonances is an essential part of adjusting an instrument after it is sounding. Records kept of this process also make it possible to confidently place the resonances in the desired location even when a reference instrument is not available.
The first requirement is to mount the cone in such a way that it will produce a clear and reproducible tap tone when removed from the instrument. For this reason the cone disc was introduced – a disc of 12mm plywood, perforated with large holes, that the cone edge is glued to. The cone disc also has positive effects on the sound right across the range.

Even with the cone disc in place, small variations in tapping the apex in the cone can excite either the primary resonance or the secondary resonance. It is therefore possible to mistakenly record the pitch of the primary resonance quite some distance from where it actually is.
The easiest solution to accurately monitor taptones is to use a simple spectrum analyser app. The one I like is for android phones, called Spectroid. It produces very clear graphs and leaves no doubt as to which resonances are which. The graphs can then be saved for future reference. Spectroid is also very useful for recording a profile of the instrument when it is fully playable. The way in which Spectroid can trace and record response with the Max Hold feature means one can just play up and down the instrument, sounding every possible tone and everything in between and at the end of the session Spectroid will be representing a very nice picture of where all the instruments peaks and troughs are……only takes a few minutes. Samples will be posted here soon.
Spectroid’s settings menu provides many options for how the graphs present information. Below are the current preferred settings as a starting point.
Audio
Audio source – default
Sampling rate – 44100hz
Processing
FFT size - 512 bins (86hz/bin
Decimations – 4
Window function - Welch
Desired transform interval – 20ms
Exponential smoothing factor – 0.95
Display
Frequency axis scale – linear
Waterfall – off
Max-hold trace – on
Peak markers – 3 markers
Screen
Stay awake – on
Miscellaneous
Subtract DC – on
Test signal -off